Tag Archives: nature

GOODBYE, OLD FRIEND

I experienced a tragedy recently over the Christmas break. This is not unique, nor is it entirely as dramatic as I’m about to make it, but let’s just say Santa took away as much as gave this year.

But I’m getting ahead of myself. Let’s take it back and set the scene:

FADE IN.

EXT. A QUIET STREET ON THE UPPER EAST SIDE. EARLY MORNING. SPRING.

EVAN, 29, is taking his dog on his morning walk. He is in sweatpants and a hoodie, hair akimbo. He is handsome but not conventionally handsome. Handsome in the way Spencer Tracey would’ve referred to Barbara Stanwyck as handsome. He has sleep in his eyes. He walks slowly though deliberately, as if trying to finish a race with as little enthusiasm as possible. FINN, his dog, SNIFFS the ground as they walk.

Suddenly there is a large CRASH. Evan whips around and sees a potted FIDDLE LEAF FIG strewn about the sidewalk, innards splayed on the curb, and a WOMAN wiping off her hands and retreating back into her brownstone. Evan rushes over, reaches down and cradles the plant’s trunks .

EVAN

(groggy)

What have they done to you my sweet precious child?

With the strength of two underdeveloped six year-olds Evan whisks the fiddle leaf fig up and rushes it back to his apartment. SHRIEKING can be heard. It is faint but high-pitched and definite.

INT. EVAN’S APARTMENT. MOMENTS LATER.

Evan pours soil into an empty planter.

EVAN

Breathe, dammit! BREATHE!

At this point he realizes he’s probably Faye Dunaway-ing this whole scene but he continues anyway. He lifts a watering can and out pours a nourishing stream over the soil and onto the plant’s roots.

EVAN

(in his best Gene Wilder)

LIFE, DO YOU HEAR ME! GIVE MY CREATION LIIIIIIIFE!!!!!

CUT TO:

image_2END SCENE.

Woo boy, that was an extremely histrionic way of saying I found a plant on the street one morning, picked it up and put it in a pot. La-di-da, right?

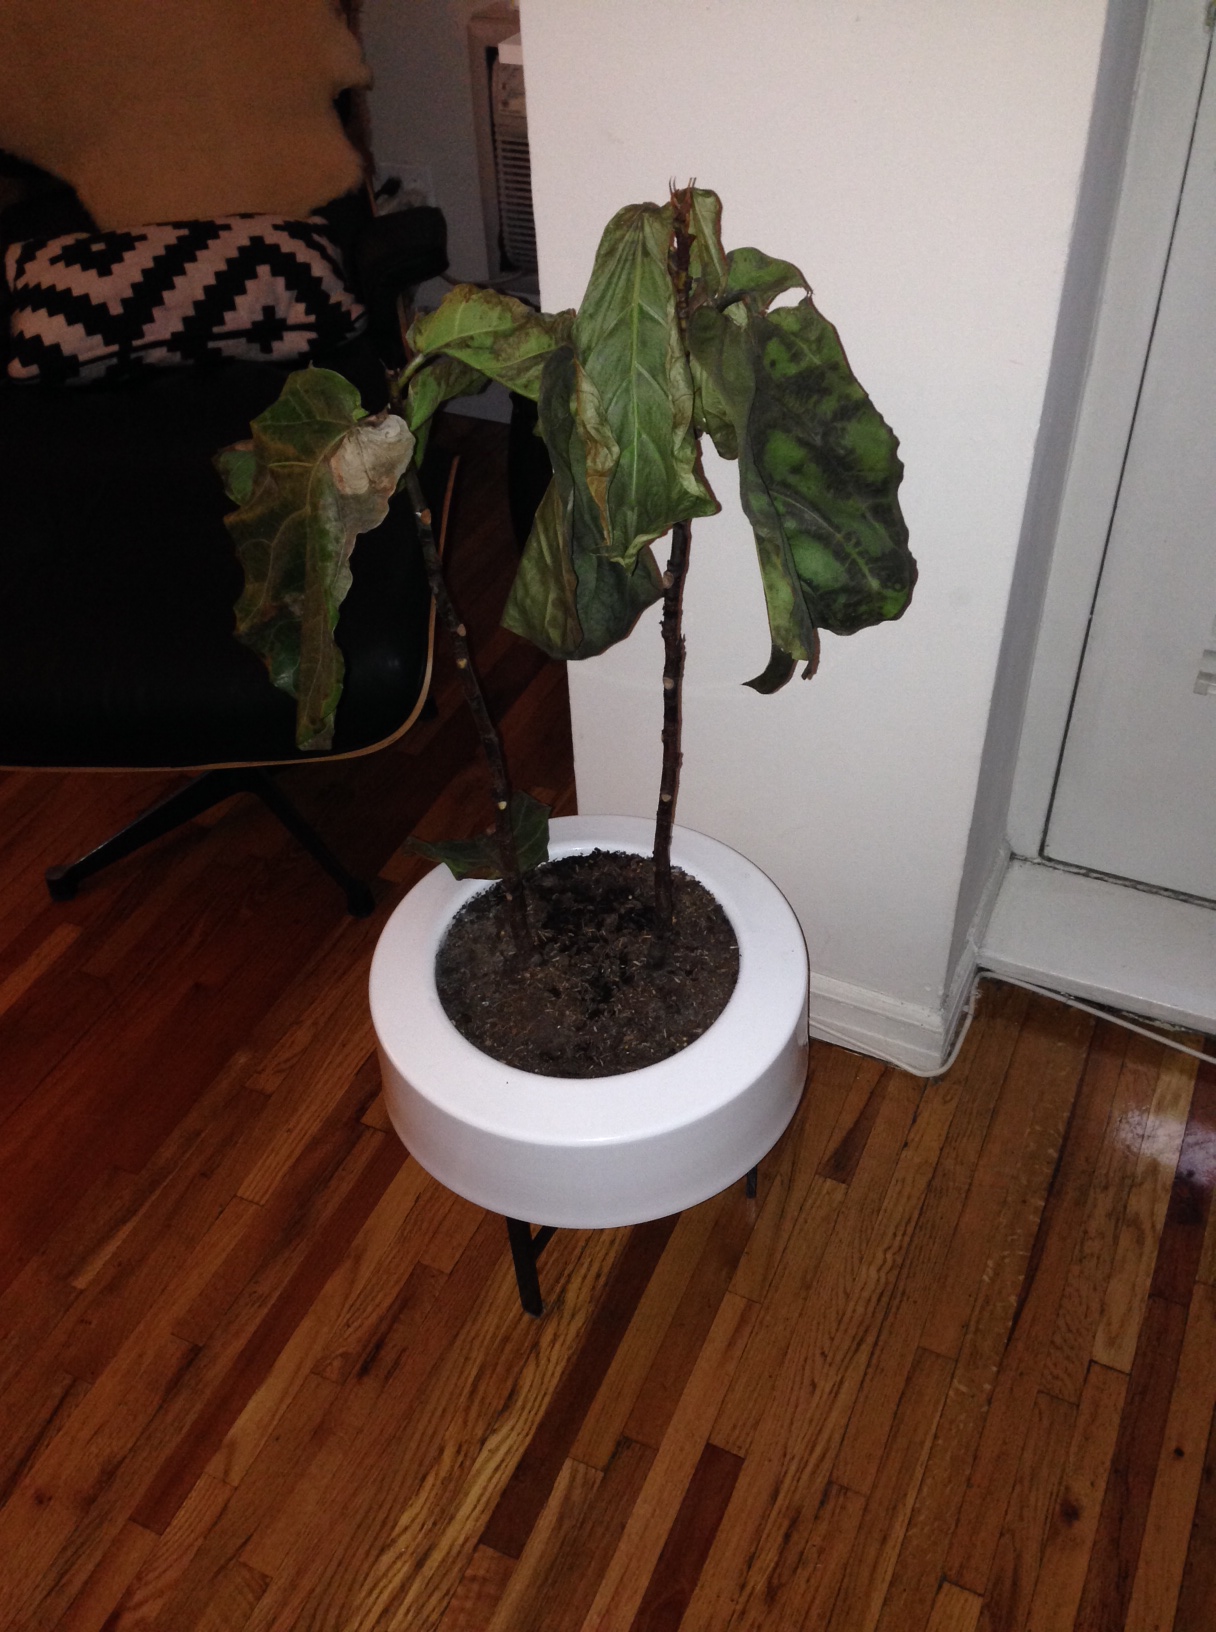
I will say this though: That fiddle leaf fig was a fucking BE-YOOT. Gorgeous! Even more so since I saw a woman chuck it on the street the morning of garbage day here in New York. After all it had been through I really considered the fact that it lasted all of spring, into summer, well past fall and onto winter an act of Jesus taking the proverbial wheel.

Then winter break came and shattered my great fortune like one of those lollipop hammers in Candy Crush:

image_1It was going so strong! Sure my apartment doesn’t get a lot of DIRECT SUNLIGHT but the only people in Manhattan who get DIRECT SUNLIGHT is (in this order) 1) Donald Trump 2) Sarah Jessica Parker 3) Richard Kind (I know, weird, right?) 4) DeBlasio and 5) Gloria Steinem. THAT’S IT. NO ONE GETS DIRECT SUNLIGHT. And, yes, I was gone for a week but I had a neighbor come in a water it while I was gone. I did everything I was supposed to do! The fact that I was able to keep a fiddle leaf fig–an orphaned fig no less–alive for this long had to have meant something, right?

It meant something alright. It meant my thermostat hadn’t kicked in yet:

imageAlas, the silent killer of the house plant is a slow and steady hiss: The radiator. The bastard! It had gotten so cold while I was gone for Christmas the steam heat in my apartment completely obliterated my precious fig.

I let it go for awhile; its rotting corpse withering before me. I tired to be okay with it, really I did, but the only thing more depressing than a dead house plant is knowing we gave Tom Hanks an Oscar for Forrest Gump, so I took some action and had it replaced:

photoNot what you expected? Well, neither did I, but the local florist on my block had palms in stock and it was palms I got. I could’ve been precious. I could’ve been demanding. I could’ve broken the bank getting a designer house plant that was a littler more trendy, but instead I went for what was cheap and in season. Because you know why? Daddy’s on a budget and these are the realities of life. YES, it makes my apartment look a bit like the safari section of a Ralph Lauren department store and, YES, I’m in danger of some nasty paper cuts, but in the end I have a live, vibrant, green, living, live and LIVING thing in my apartment and it is a sight to behold.

I guess the lesson is this: do what makes you happy as long as it’s within your budget. Fiddle leaf figs, although ‘of the moment’ (hello, Elle Decor, there are other shrubs out there), are also pricey, and if you can’t afford what Richard Mishaan is using in his interiors then don’t sweat it, my friend. A little green can go a long way, no matter what kind of green it may be.

Bring some life into your space and don’t be deterred when it dies. It will be worth the experience and brighten up your day.

BTW: NYC Pigeon Pendant by Three Potato Four. Check them out!

NIGHTSTAND DIY

Last month you might remember I mentioned an exciting little nugget of DIY showed up on my doorstep. Well, that mystery package was actually a hunk of beautiful Northern California buckeye burl wood and the DIY in question is a new, sexy and rugged nightstand for myself.

The inspiration came from Morgan over at The Brick House. She did a fantastic color dipping project for Sherwin-Williams’ National Painting Week which I have been dying to do myself ever since I read about it. (By the way, go check out her blog! It’s brilliant and you’ll be much smarter for having given it a look-see. Promise.)

If you scroll down to my previous post about upcycling my Jon Hamm look-a-like lamp the last picture shows what I was working with in the nightstand department. When I moved into my studio I needed a something in a pinch and chose the Mid-Century Nightstand from West Elm. While I like West Elm furniture (my bed is WE and has been outstanding for going on five years now) it didn’t really fit the style of my apartment–I always knew I’d swap it out at some point–and once I found the perfect piece of lumber (from eBay! Who knew?) I finally had the opportunity to do something unique with the space next to my bed.

IMG_4413

The piece came totally raw, so I first started by finding the lowest grade sandpaper the corner hardware store carried (40) a buying a lot of it. I don’t generally recommend buying sanding blocks. If you’re like me and don’t have a lot of storage go with paper sheets instead. They’re just as effective, cost less and are easy to store if you have leftovers. I seem to always have a use for sandpaper, too (strange, I know), so having a little extra is always a good thing. Plus, for this project, you will need an assload.

Then I set about creating a smooth and even surface by sanding with the wood’s grain until my hands became bloody stumps. Even though I new which side would be my top I sanded both sides of the wood anyway. It might seem like more work than’s necessary but if you don’t you’ll have wood dandruff flaking off from the underside of your nightstand for years to come.IMG_4416Burl wood is a fairly soft wood but if you get a piece as raw as mine you’ll really need to work at it to get an even consistency throughout the piece. IMG_4417Also, burl wood is an abnormal growth found on trees, the product of an environmental stress suffered by the tree, most often caused by fungal or insect infection, so you may need to sand deeper than you expected to eradicate any bands of dead fungus or such. (Oh, nature!)

IMG_4418Oh wait, did I mention sanding until your hands are nothing more than oozy little potato buds? I did? Well, ok, I really meant it.

IMG_4422

Seriously sanding Susan

If you’re not giving yourself blisters THEN I DON’T WANT TO HEAR IT.

Once you’re done with the coarse sanding and you’ve bound and dressed your wounds, if you can still lift your arms take a finer grade sand paper (120 or higher) and give the whole thing a little love. Nothing nuts, just light and even to smooth the whole thing out. Again, with the grain people. The grain is your friend.

Now, depending on the piece of wood you find–raw, vintage, pre-stained–this step may be different for you. Since my piece was raw (and because I’ve made no illusion to being a patient person) I didn’t use a primer; just went straight to staining. If you don’t have a raw piece of wood, or if you do and are seeking a specific tone, priming never hurts and will always give you the upper hand. I, however, had some leftover stain from a previous project that wasn’t as dark as I wanted so I knew I’d be making several passes with the stuff to enrich the color anyway, regardless of the wood absorbing the stain or not. Leave it to me to not do thing the way you’re supposed but that’s half the fun of DIY-ing. You have to find your groove!

Speaking of staining, I get asked a lot what kind of brush do you use for what and why. Well, friends, this may be wildly inappropriate for me to admit but I don’t really know. Nor do I care. I use foam brushes for just about everything because I feel they’re more forgiving than bristle brushes when you make a mistake. Plus you’re not forced to hunt for runaway bristles stuck in the coat of the thing you’re painting/staining/priming/sealing. For me, it just cuts out the worry of screwing up. So…foam brushes. Forever and always.

IMG_4419

Dark walnut beauty

Stained and drying, I went on to the next step: the legs. For this you’ll need an equal number of galvanized pipes and floor flanges. No, a flange is not one of Pheobe Buffay’s fake names, but what you’ll need to affix the leg to the bottom of the nightstand. The size and length are totally up to you. For this project I used three 1/2″ x 12″ pipes and their corresponding flanges. Home Depot will always have this stuff in stock–look in the plumbing aisle.

Grab a ball of twine while you’re out, too. Jute is best or any other kind of untreated rope. I found a roll of jute at the corner hardware store for $3. Just don’t get anything waxy or plastic. You won’t be able to paint that and also…gross.

IMG_4426Warning: this next part may obliterate your thumbs, so if you actually gave yourself blisters from sanding earlier, well, (1st) Bravo to you, welcome to the club! and (2nd) you may want to wait until you’re healed before attempting the following. However if you’re feeling wildly adventurous throw on that White Snake denim jacket and continue being a total badass!

IMG_4427Screw the flange to one end of the galvanized pipe. Place a small bead of glue (I used hot glue because I’m Martha Stewart and have a glue gun at the ready at all times, motherfucker, but you can use Gorilla Glue or something else if you’re basic like that) at the top, where the flange meets the pipe.

Using your bruised and bloody thumb as a guide tightly wind the jute around the pipe with your other hand, pushing upward with your thumbs every few rotations to make sure everything’s right and tight. I used a relatively thin gauge of twine so it took me about 30 minute/pipe, but if you’re using thicker rope it may go quicker.

Drop a little beadlet of glue every inch or so along the pipe to make sure the jute doesn’t jostle. When you reach the end of the pipe cut the twine, giving yourself roughly 1/2″ on the end to tuck inside the pipe and glue. Maybe do this step with a knife, or chopstick if you have one handy, so as not to burn yourself/adhere your first layer of skin to the pipe.

Once that’s done it’s time for my favorite activity: spray painting wildly and without abandon! Like Morgan did in her post, you can dip the legs in a can of paint, which is probably easier and less messy, but I didn’t have any so I just went full tilt with a can.

The length of the color block is totally up to you. I did 3″ from the bottom of the leg, taped if off and covered the rest of the leg in a grocery bag:

IMG_4428Jute is spongy so don’t be surprised if you have to dip or spray a few times to get your desired color density. Those should dry pretty quickly but you may be held up at this point for a day or two as you wait for the stain to dry before applying your top coat.

I’m not a huge fan of polyurethane in general (it just seems so obviously environmentally egregious) but I understand why we use them, so use it I did. It’s important to seal up your work after putting this much time and energy into it. When you do apply the poly top coat definitely use a foam brush. High gloss polys are very unforgiving to mistakes so a fat foam brush will be your best friend for this next step. I also recommend three to four coats. Seriously. You know I’m not a fan of extra steps but I think you’ll really be glad you took the time here.

Allow each coat of poly to dry fully before taking a microgrit sandpaper (maybe 240) and lightly sand to even out any inconsistencies. And, as always, wear your mask and goggles, ya dopes! How many times do I have to say it!?

IMG_4441Wipe off the poly dust you made from sanding with a damp rag, let the surface dry then repeat the whole thing again until the top of the nightstand has your desired sheen.

Oh right. I already attached my legs by now, so you should do that, too. Screw those suckers on.

IMG_4442Last, pick up some Johnson Paste Wax. It’s like $6 and you can find it anywhere, maybe even at your local drugstore. This will give your studly table a creamy, smooth and delicious finish.

Take your time and work it into the wood. You’ll want to do this every 3-4 months or so just to keep the top supple and sexy. Grrrr!

IMG_4446And that’s it!

I will finish this post by saying this project was CHEAP (because it was) but I won’t finish this post by lying saying it was quick. The steps are easy and require very little skill, but you really need to set aside an entire weekend and then some to complete the process.

I will say, however, that your time will be rewarded ten fold. This thing is a real beauty.

Also, see that nudey portrait in the stunning aluminum frame? I found it the day before, leaning against a tree on my block, while taking Finn on his morning walking. Pretty great, right?

*Cue the Countess*

WANT: MAN & CAMERA

I stumbled over Man & Camera‘s stunning photography at Society 6 a few days ago and I can’t get them out of my head:

Yoho 1I’ve been thinking about switching out some artwork in the bathroom. I think a few of these could be what I need!CNPP IIArt should be something you don’t mind waking up to every morning. I might not have the most sophisticated taste when it comes to what’s on my walls, but everything that’s there are pieces I love looking at time and again. Also, as I continue to cultivate my tastes and decide what I want and don’t want in my home, cheap artwork really ticks my box.

6809030_13591356-prn01_lzA piece of photography that didn’t break the bank can also be a great hand-me-down gift to friends and family. I love it when someone upcycles their artwork to me.

Go check him out! Pair these super affordable prints with Ikea’s RIBBA series of frames and you’ve got a slick new look for less than $30 each.